
Razorpay

Two Minute Billing collects recurring rupee payments through your Razorpay account: cards, UPI Autopay and netbanking eMandate. The customer approves a mandate once, and Two Minute Billing charges each renewal against it. You keep your Razorpay rates, and Razorpay settles to your bank as usual.
Before you start
- A Razorpay account. Test mode works at once; live mode needs Razorpay to check your website details first.
- Razorpay gives you two sets of keys: test and live. Connect the test keys to a test business and the live keys to a live business.
- Only the Owner and Admin roles in Razorpay can see API keys.
- Recurring card payments need Razorpay to enable them on your account. Ask Razorpay support before you offer cards. UPI Autopay and netbanking eMandate do not need this.
- A customer needs a phone number to save a payment method on Razorpay. Razorpay refuses a mandate without one.
- You need permission to manage payment gateways in Two Minute Billing. The owner and admin roles have it.
Find your API keys
In the Razorpay Dashboard, select Test or Live mode to match the business you are connecting. Go to Account & Settings → Websites & API keys and click Generate Key.
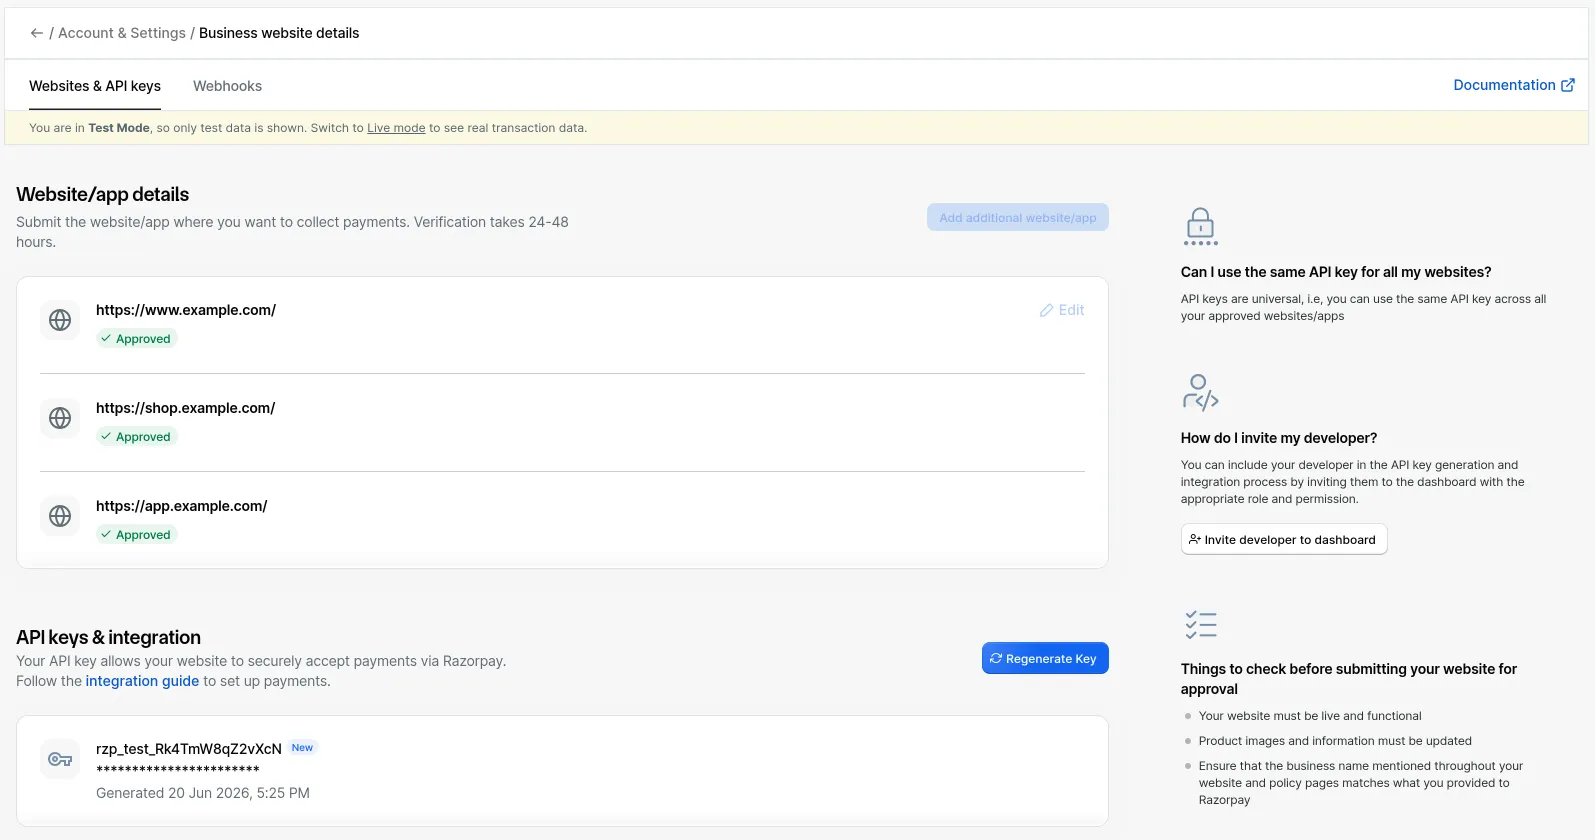
You need two values:
| Field | Where to find it | Looks like |
|---|---|---|
| Key ID | Razorpay Dashboard → Account & Settings → Websites & API keys. | rzp_live_… |
| Key Secret | Razorpay shows it once, when you generate the key. | — |
Permissions
- Recurring card payments. Razorpay must enable them on your account: ask Razorpay support before you offer cards. UPI Autopay and netbanking eMandate are on by default.
- Customer phone numbers. Razorpay needs the customer's phone number for a recurring payment.
- Webhook events. Two Minute Billing registers the webhook and selects the events for you. If you add it by hand, select every event in the list under Webhooks: Razorpay has no "all events" option, and a missing event means a missed payment, refund or dispute.
Connect it in Two Minute Billing
- Open Settings → Payment gateways and click Add gateway.
- Select Razorpay and paste the Key ID and the Key Secret.
- Select the currencies and the payment methods this account handles.
- Click Create gateway account.
Then open the account and click Check credentials. Healthy means Razorpay accepted the keys.
The payment methods you can turn on for Razorpay:
- Cards
- UPI Autopay — INR only. The debit settles asynchronously.
- Netbanking (eMandate) — INR only.
Each mandate has a per-charge limit that the customer approves. Two Minute Billing sets it from the plan price, with room for growth. UPI Autopay allows at most ₹1,00,000 per charge. A card charge above ₹15,000 needs the customer to approve it again, so it cannot be collected automatically. Netbanking eMandate does not have the ₹15,000 limit and allows up to ₹10,00,000 per charge.
Currencies
Two Minute Billing offers these 124 currencies on Razorpay:
AED, ALL, AMD, AUD, AWG, AZN, BAM, BBD, BDT, BHD, BIF, BMD, BND, BOB, BRL, BSD, BTN, BWP, BZD, CAD, CHF, CLP, CNY, COP, CRC, CVE, CZK, DJF, DKK, DOP, DZD, EGP, ETB, EUR, FJD, GBP, GHS, GIP, GMD, GNF, GTQ, GYD, HKD, HNL, HTG, HUF, IDR, ILS, INR, IQD, ISK, JMD, JOD, JPY, KES, KGS, KHR, KMF, KRW, KWD, KYD, KZT, LAK, LKR, LRD, LSL, MAD, MDL, MGA, MKD, MMK, MNT, MOP, MUR, MVR, MWK, MXN, MYR, MZN, NAD, NGN, NIO, NOK, NPR, NZD, OMR, PEN, PGK, PHP, PKR, PLN, PYG, QAR, RON, RSD, RUB, RWF, SAR, SCR, SEK, SGD, SOS, SVC, SZL, THB, TND, TRY, TTD, TWD, TZS, UAH, UGX, USD, UYU, UZS, VND, VUV, XAF, XCD, XOF, XPF, YER, ZAR, ZMW
INR is on by default. The other currencies need Razorpay to enable international payments on your account. UPI Autopay and eMandate are INR only. Razorpay settles in INR.
A new gateway account takes INR only. After Razorpay enables international payments on your account, enable International payments when you create the gateway account in Two Minute Billing, or later in its settings. Until you do, Razorpay gets no payments in other currencies.
If you leave Currencies empty on the gateway account, the account takes each currency of your business that is on this list.
Webhooks
Razorpay tells Two Minute Billing about things that happen after a charge: a UPI or netbanking debit that settles later, a mandate that is confirmed, paused or cancelled, a refund, a dispute.
Two Minute Billing registers the webhook with Razorpay for you when you save the account. Nothing to copy.
If the gateway account page shows the webhook as not configured:
- In Razorpay, go to Account & Settings → Website and app settings → Webhooks. Click Add New Webhook.
- Paste the notification URL and the secret on the gateway account page into the URL and Secret fields.
- In Active Events, select these events: payment.captured, payment.authorized, order.paid, payment.failed, refund.processed, refund.failed, refund.created, payment.dispute.created, payment.dispute.won, payment.dispute.lost, payment.dispute.closed, payment.dispute.action_required, payment.dispute.under_review, token.confirmed, token.rejected, token.cancelled, token.paused, settlement.processed. Other events are not necessary.
- Click Create Webhook.
Test it
In your test business, create a customer with a phone number and save a payment method for it:
- UPI Autopay: enter the UPI ID
success@razorpay. Usefailure@razorpayto see a failure. - Card: use the Razorpay subscription test card
4718 6091 0820 4366with any future expiry date and any CVV. On the test bank page, enter any OTP of 4 to 10 digits.
Collect an invoice. A UPI Autopay debit is marked paid when Razorpay reports it settled, which can take a while. Logs shows the call to Razorpay and Razorpay's answer.
Go live
- In the Razorpay Dashboard, switch to Live mode and generate the live keys
(
rzp_live_…). - If you offer cards, make sure Razorpay has enabled recurring card payments on the live account.
- In your live business, add Razorpay with those keys.
- Two Minute Billing registers a separate webhook for live mode. Check it under Account & Settings → Webhooks (under Website and app settings) in Razorpay.
Troubleshoot
- Check credentials says "We could not check the credentials." with "RazorPay auth/order failed: 401". The key ID or the key secret is wrong, or they come from the other mode. Generate the keys again in the correct mode and update the gateway account.
- Saving a payment method fails with "Razorpay requires a phone number for recurring payments." Add a phone number to the customer, then try again.
- A checkout or an invoice in a currency other than INR does not offer Razorpay. Enable International payments on the gateway account. Do this only after Razorpay enables international payments on your Razorpay account.
- A UPI Autopay debit stays pending for about a day. Razorpay sends the customer a pre-debit notice and takes the money about 25 hours later. A netbanking debit can take up to 2 working days. Two Minute Billing marks the invoice paid when Razorpay reports the debit.
- A charge fails with "This charge of … is more than the … per-charge limit approved for this payment method." The invoice is larger than the limit on the customer's mandate. Ask the customer to approve a new payment method. A retry cannot succeed.
Related
PayPal
Connect your PayPal account to Two Minute Billing: find your REST app credentials, connect them, and let Two Minute Billing register the webhook. Recurring payments from a saved PayPal wallet.
Square
Connect your Square account to Two Minute Billing: find your access token, application ID and location ID, connect them, and let Two Minute Billing register the webhook. Cards on file, one currency for each location.