
PayPal


Two Minute Billing charges your customers' PayPal wallets through your PayPal business account. The customer approves once on PayPal's page, and Two Minute Billing charges each renewal from the saved wallet. You keep your PayPal rates, and the money goes to your PayPal balance as usual.
Before you start
- A PayPal business account and access to the PayPal Developer Dashboard. A new developer account comes with a Default Application and two sandbox accounts: a personal account to pay with and a business account to sell with.
- PayPal gives each REST app two sets of credentials: Sandbox and Live. Connect the Sandbox credentials to a test business and the Live credentials to a live business.
- Optional, recommended: turn on Transaction search in your app's settings. If PayPal's answer to a charge is lost on the way, Two Minute Billing uses it to look the payment up. Without it, the payment stays open until PayPal's capture webhook arrives.
- You need permission to manage payment gateways in Two Minute Billing. The owner and admin roles have it.
Find your API keys
In the PayPal Developer Dashboard, set the Sandbox | Live toggle to match the business you are connecting. Open Apps & Credentials and select your app under REST API apps.
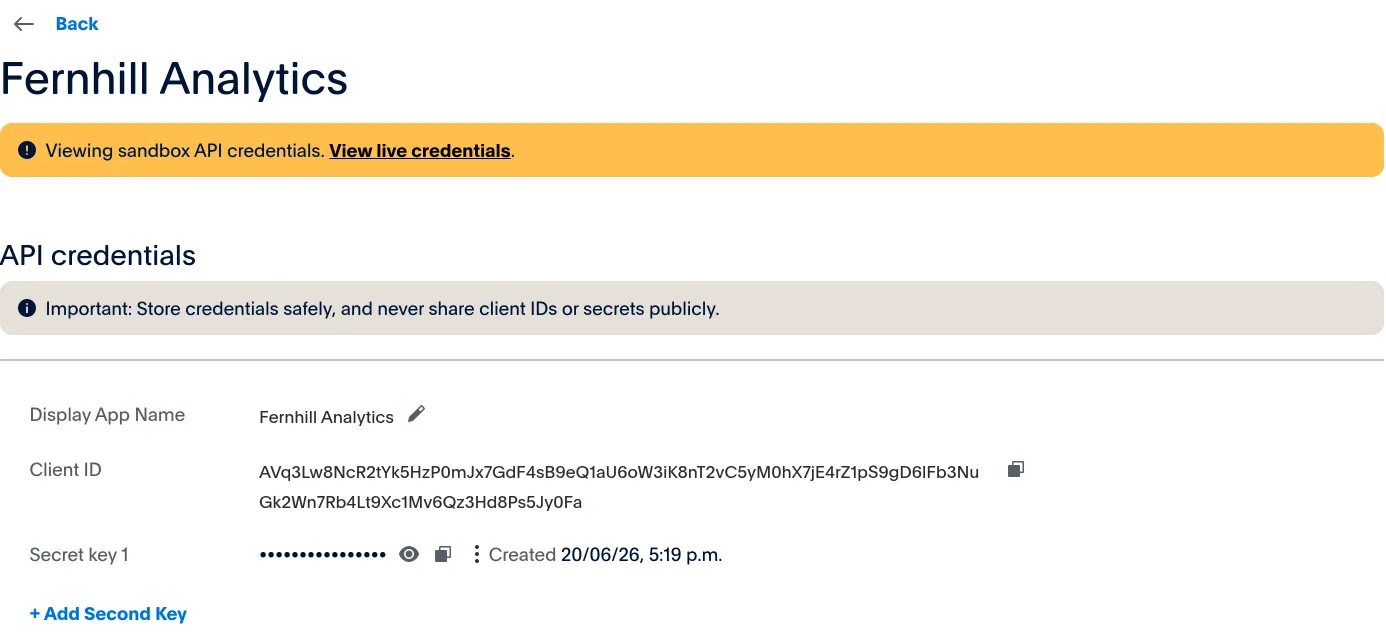
You need two values:
| Field | Where to find it | Looks like |
|---|---|---|
| Client ID | The Client ID of your PayPal REST API app. | AYS… |
| Client Secret | On the same app page, under the Client ID. | — |
Permissions
Open the app in Apps & Credentials and check these features. The Sandbox and the Live version of the app have separate settings, so check both.
| Feature | Required? | Two Minute Billing uses it to |
|---|---|---|
| Payment capabilities → Save payment methods | Required | Save the customer's PayPal account or card, then charge renewals without the customer |
| Add-on services → Transaction search | Recommended | Find a payment whose answer from PayPal was lost on the way |
Two Minute Billing does not use the Customer disputes feature: disputes come by webhook.
For live payments, PayPal must also approve your business account to save payment methods. If customers cannot save PayPal as a payment method in live mode, ask PayPal to enable it for your account.
Webhook: Two Minute Billing registers the webhook with the app's credentials. No other permission is necessary. A PayPal app can have at most 10 webhooks.
Connect it in Two Minute Billing
- Open Settings → Payment gateways and click Add gateway.
- Select PayPal and paste the Client ID and the Client Secret.
- Select the currencies and the payment methods this account handles.
- Click Create gateway account.
Then open the account and click Check credentials. Healthy means PayPal accepted the credentials.
The payment methods you can turn on for PayPal:
- PayPal wallet — A billing agreement that the buyer approves.
PayPal in Two Minute Billing takes PayPal wallets only. To take cards, connect a second gateway for them.
Currencies
Two Minute Billing offers these 25 currencies on PayPal:
AUD, BRL, CAD, CHF, CNY, CZK, DKK, EUR, GBP, HKD, HUF, ILS, JPY, MXN, MYR, NOK, NZD, PHP, PLN, RUB, SEK, SGD, THB, TWD, USD
BRL, CNY and MYR need a PayPal account in that country. If your PayPal account does not hold the currency, set your payment receiving preferences in PayPal. If you do not, the payment stays pending.
If you leave Currencies empty on the gateway account, the account takes each currency of your business that is on this list.
Webhooks
PayPal tells Two Minute Billing about things that happen after a charge: a payment that completes later, a refund made in PayPal, a dispute, a customer who cancels the agreement in PayPal.
Two Minute Billing registers the webhook with PayPal for you when you save the account. Nothing to copy.
If the gateway account page shows the webhook as not configured:
- Click “Register with PayPal” on the gateway account page. We create the webhook and store its ID.
- Optional: confirm it under your app's settings → Webhooks.
Test it
In your test business, create a customer and save a PayPal wallet for it. On PayPal's page, sign in with your sandbox personal account and approve. Its email and password are in the Developer Dashboard under Sandbox → Accounts. Collect an invoice: it is marked paid, and Logs shows the call to PayPal and PayPal's answer.
Go live
- In the PayPal Developer Dashboard, set the toggle to Live and open your app under Apps & Credentials.
- Under Features → Payment capabilities, turn on Save payment methods. Without it, customers cannot save a PayPal wallet.
- Optional: turn on Transaction search for the live app too.
- In your live business, add PayPal with the live Client ID and Client Secret.
- Two Minute Billing registers a separate webhook for the live app. Check it under your app's Webhooks in the Developer Dashboard.
Troubleshoot
- Check credentials says "We could not check the credentials." with "PayPal OAuth failed: 401". The client ID or the secret is wrong, or they belong to the other environment. Copy both again from the app in Apps & Credentials, with the toggle set to the correct mode.
- The account page shows the webhook as not configured. Follow the steps under Webhooks.
- Registering the webhook fails because the app has 10 webhooks. A PayPal app can have at most 10. In the app's Webhooks section, delete one you no longer use, then register again.
- A customer says PayPal asks them to add a card. PayPal does not allow automatic payments from a PayPal balance alone, so it asks the customer to add a card. When Use balance first is on, PayPal still takes each renewal from the balance first.
Related
Stripe
Connect your Stripe account to Two Minute Billing: find your API keys, connect them, and let Two Minute Billing register the webhook. Cards, ACH and SEPA Direct Debit.
Razorpay
Connect your Razorpay account to Two Minute Billing: find your API keys, connect them, and let Two Minute Billing register the webhook. Cards, UPI Autopay and netbanking eMandate in INR.