
Authorize.net


Two Minute Billing charges cards and US bank accounts (eCheck, an ACH debit) through your Authorize.net account. You keep your Authorize.net rates, and your card processor pays out to your bank as usual.
Before you start
- An Authorize.net account. The sandbox is a separate account with its own credentials, and sandbox credentials never work in production. Connect sandbox credentials to a test business and production credentials to a live business.
- Each Authorize.net merchant account takes one currency. Select that currency when you connect it.
- A Public Client Key, for the card form your customers fill in. In the Merchant Interface, open Account → Account and API Settings → API Credentials and Keys and, under Public Client Key, click Generate new public client key if there is none.
- You need permission to manage payment gateways in Two Minute Billing. The owner and admin roles have it.
Find your API keys
In the Merchant Interface, open Account → Account and API Settings → API Credentials and Keys. The API Login ID is on this page. To get a Transaction Key or a Signature Key, click Generate new transaction key or Generate new signature key. Authorize.net asks for a PIN that it sends to you, then shows the key.
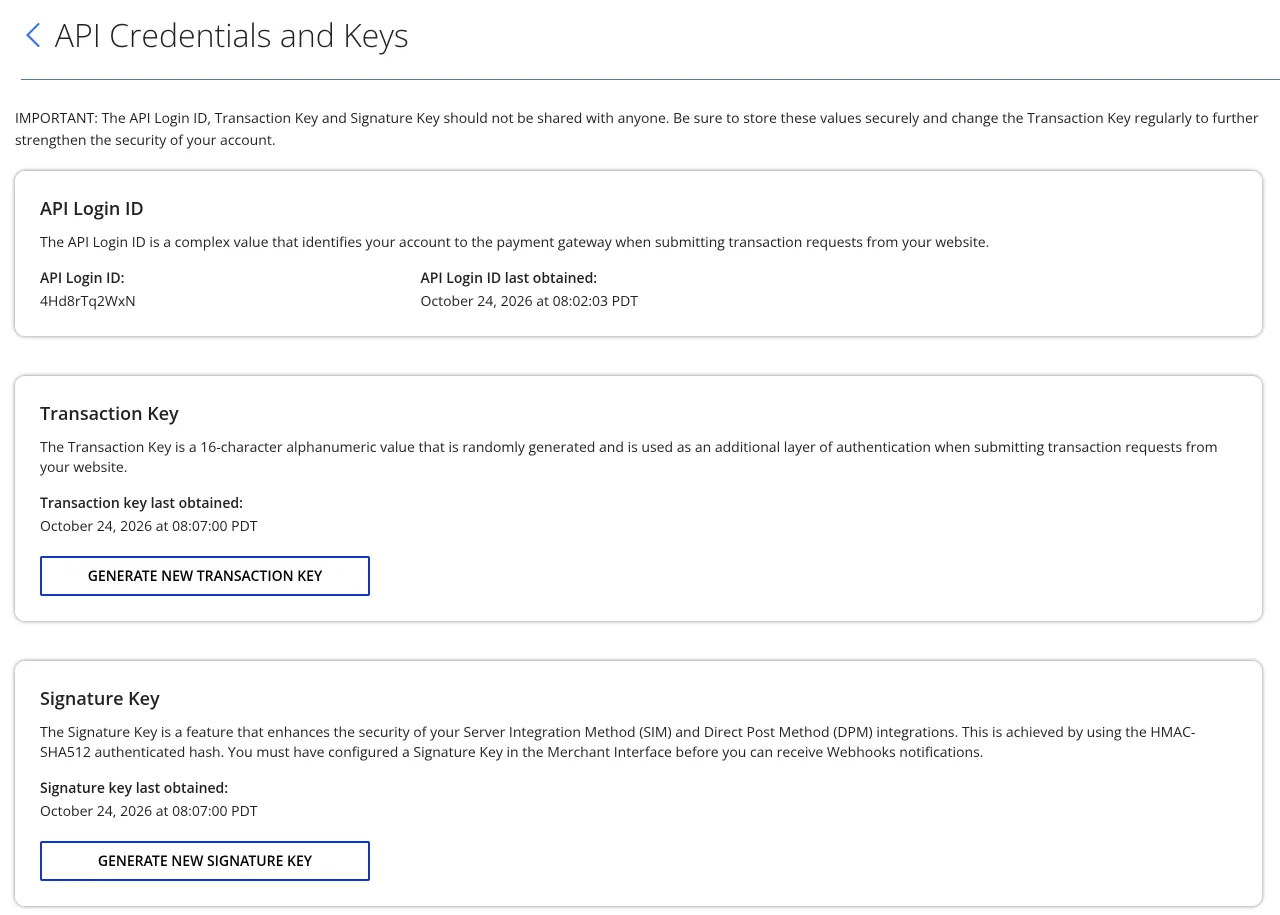
You need three values:
| Field | Where to find it | Looks like |
|---|---|---|
| API Login ID | Authorize.net Merchant Interface → Account → Account and API Settings → API Credentials and Keys. Also turn on the Transaction Details API: we use it to find payments and refunds. The business test or live mode selects the Authorize.net environment. | — |
| Transaction Key | Make it on the same page. | — |
| Signature Key | Make it on the same page. It has 128 characters. We use it to check the webhooks from Authorize.net. | — |
Permissions
- In the Merchant Interface, turn New Authorize.net off at the top right.
- Open Account → Settings → Security Settings → General Security Settings → Transaction Details API.
- Answer your secret question and click Enable Transaction Details API.
Also check these:
- Signature Key. Authorize.net sends webhooks only after you make a Signature Key.
- Public Client Key. The card form your customers fill in needs one.
- Customer Information Manager. Two Minute Billing saves cards and bank accounts as customer payment profiles. If saving one fails, ask Authorize.net to enable customer profiles on your account.
- eCheck, for bank accounts. eCheck is a separate service on a production account: apply for it in the Merchant Interface, or ask Authorize.net. Ask for the WEB and PPD eCheck types, and CCD if you bill businesses. Bank accounts that your customers save online are debited as WEB. Authorize.net refunds a WEB debit as PPD (CCD for a business account), so without PPD or CCD you cannot refund a settled bank debit.
| What you turn on | What Two Minute Billing uses it for |
|---|---|
| Transaction Details API | Finds lost answers, refunds and voids made in the Merchant Interface, and reads the daily batches: eCheck settlements and returns arrive only there. |
| Customer Information Manager | Saves cards and bank accounts as payment profiles, and charges them. |
| Public Client Key | Opens the Authorize.net form where your customers enter a card or a bank account. |
| Signature Key | Checks the webhooks. |
| eCheck: WEB | Debits the bank accounts that your customers save online. |
| eCheck: PPD, CCD | Refunds a settled bank debit. |
Connect it in Two Minute Billing
- Open Settings → Payment gateways and click Add gateway.
- Select Authorize.net and paste the API Login ID, the Transaction Key and the Signature Key.
- Select the currency and the payment methods this account handles.
- Click Create gateway account.
Then open the account and click Check credentials. Healthy means Authorize.net accepted the API Login ID and the Transaction Key. The check also looks at the webhook and tells you if Authorize.net has stopped sending events to it.
The payment methods you can turn on for Authorize.net:
- Cards
- eCheck (ACH) — US bank accounts, USD. Turn on eCheck in Authorize.net first. A debit takes up to 7 days to settle. The payer accepts our debit authorization when they save the account.
A bank account is saved first and charged later: it is not offered for a payment that the customer makes on the spot. A bank debit stays pending until Authorize.net settles its batch, usually the next day, and the money reaches you in up to seven days. A bank can still return the debit after that, for example for insufficient funds (code R01). Two Minute Billing reads the returns from the daily batches and marks the payment as failed, and dunning starts.
Currencies
Two Minute Billing offers these 6 currencies on Authorize.net:
AUD, CAD, EUR, GBP, NZD, USD
Each gateway account takes one currency, and your processor sets which one. For example: USD or CAD in North America, GBP or EUR in Europe, AUD or NZD in Asia-Pacific.
Some payment methods take one currency only:
| Payment method | Currency |
|---|---|
| eCheck (ACH) | USD |
If you leave Currencies empty on the gateway account, the account takes each currency of your business that is on this list.
Webhooks
Authorize.net tells Two Minute Billing about things that happen after a charge: a refund or a void made in the Merchant Interface, a fraud hold that is approved or declined, a saved card that changes. Authorize.net signs each event with your Signature Key, and Two Minute Billing uses that key to check it.
Two Minute Billing registers the webhook with Authorize.net for you when you save the account. Nothing to copy.
If the gateway account page shows the webhook as not configured:
- In the Authorize.net Merchant Interface, go to Account → Settings → Webhooks → Add Endpoint.
- Paste the notification URL shown on the gateway account page. Select the payment events and the payment profile events. Set the status to Active and click Save.
Test it
In your test business, create a customer and save the test card 4111 1111 1111 1111 with any
future expiry date and any three-digit CVV. Collect an invoice: it is marked paid, and Logs
shows the call to Authorize.net and Authorize.net's answer.
To test eCheck, turn on eCheck (ACH) for the gateway account. In the portal, add a US bank account, accept the authorization, and enter any valid US routing number with any account number. The sandbox accepts a debit under $100 and declines one over $100. The payment stays pending: the sandbox does not settle eCheck, so you cannot test a settlement, a return or the refund of a settled bank debit there. A full refund of a pending bank debit cancels it (a void).
Go live
- Sign in to your production Merchant Interface and make a Transaction Key, a Signature Key and a Public Client Key there. Copy the production API Login ID.
- In your live business, add Authorize.net with those values.
- Two Minute Billing registers a separate webhook for production. Check it under Account → Settings → Webhooks in the Merchant Interface.
Troubleshoot
- Check credentials says "We could not check the credentials." with "Authorize.net refused the API Login ID or Transaction Key". A value is wrong, or it belongs to the other environment. Copy the API Login ID again, make a new Transaction Key if necessary, and update the gateway account.
- Check credentials says "Correct the settings below." with "Authorize.net set the webhook … to inactive". Authorize.net stops sending events after 10 failed deliveries. Open the gateway account and register its webhook again, or set its status to Active under Account → Account and API Settings → Webhooks in Authorize.net.
- A partial refund is refused with "Authorize.net cannot refund part of this payment before it settles". Before a card payment settles, usually within one day, Authorize.net can only cancel the whole payment. Refund the full amount, or wait until the payment settles and then refund any amount.
- Saving a bank account fails, or a bank debit is declined at once. eCheck is not on for your account, or the debit is over your eCheck limit. Ask Authorize.net to enable eCheck with the WEB type, and check your eCheck limits.
- A bank debit refund is refused with "Authorize.net refunds a bank debit only for 180 days after it settles". Refund the customer outside Authorize.net and record the refund offline.
- The card form does not open, with "This Authorize.net account has no Public Client Key". Open Account → Account and API Settings → API Credentials and Keys and, under Public Client Key, click Generate new public client key. Then try again.
Related
Mollie
Connect your Mollie account to Two Minute Billing: find your API key and connect it. No webhook to set up. Cards, SEPA Direct Debit and PayPal.
GoCardless
Connect your GoCardless account to Two Minute Billing: make an access token, connect it, and add the webhook in GoCardless. Bank Direct Debit in eight schemes, and PayTo.